
Getting your site into Google Search Console is step one of any serious SEO effort, and verification is the gatekeeper. I’ve walked dozens of clients through this process, and the confusion almost always comes from the same place: too many methods, unclear instructions, and no context for which one fits your situation. This guide covers exactly how to verify ownership on Google Search Console using all five methods, so you can pick the right one and get your data flowing.
TL;DR
- Google offers five verification methods: HTML file, HTML meta tag, DNS TXT record, Google Analytics, and Google Tag Manager.
- DNS TXT verification is the most robust for domain properties; HTML meta tag is fastest for URL prefix properties.
- Failed verification almost always traces to a missing tag, incorrect placement, or a redirect stripping the token.
- Once verified, connect sneo AI to your Search Console property for AI-driven analysis of your traffic and indexing data.
What Is Google Search Console Verification and Why Does It Matter?
Before I walk you through how to verify ownership of Google Search Console, let me explain what’s actually happening under the hood, because it changes which method you’ll choose.
Google needs to confirm you are the legitimate website administrator before granting access to sensitive crawl data, indexing reports, and manual action alerts. The verification process proves control: you demonstrate access to the site’s code, DNS records, or an already-trusted analytics property.
There are two property types you’ll encounter:
| Property Type | What It Covers | Best Verification Method |
| Domain property | All subdomains, HTTP and HTTPS | DNS TXT record only |
| URL prefix property | One specific URL and its subdirectories | Any of the five methods |
For most individual site owners and freelancers, a URL prefix property is fine. For agencies managing client sites at scale, or anyone running subdomains, a domain property gives you consolidated data in one place.
Why verification matters beyond just “getting access”:
- Without site ownership confirmation, you cannot submit an XML sitemap.
- Unverified properties block access to crawl error reports, which are foundational to understanding website crawlability.
- Search indexing visibility, including page coverage and enhancement reports, is locked behind verification.
- If a manual action hits your site, you won’t receive the notification without an active verified property.
Google also allows multiple verified owners per property, which is how agencies add client access without handing over the primary Google account. This is worth remembering: verification is not a one-seat-per-site restriction.
If you’ve ever wondered why SEO work seems to stall in the first few weeks, an unverified Search Console property is often the reason. You’re flying blind without the data it provides.
For context on why consistent technical hygiene like this matters over the long haul, understanding what ongoing SEO involves will frame the bigger picture for you.
The 5 Ways to Verify Ownership in Google Search Console
Here are all five methods as documented by Google, with my practical commentary on each.
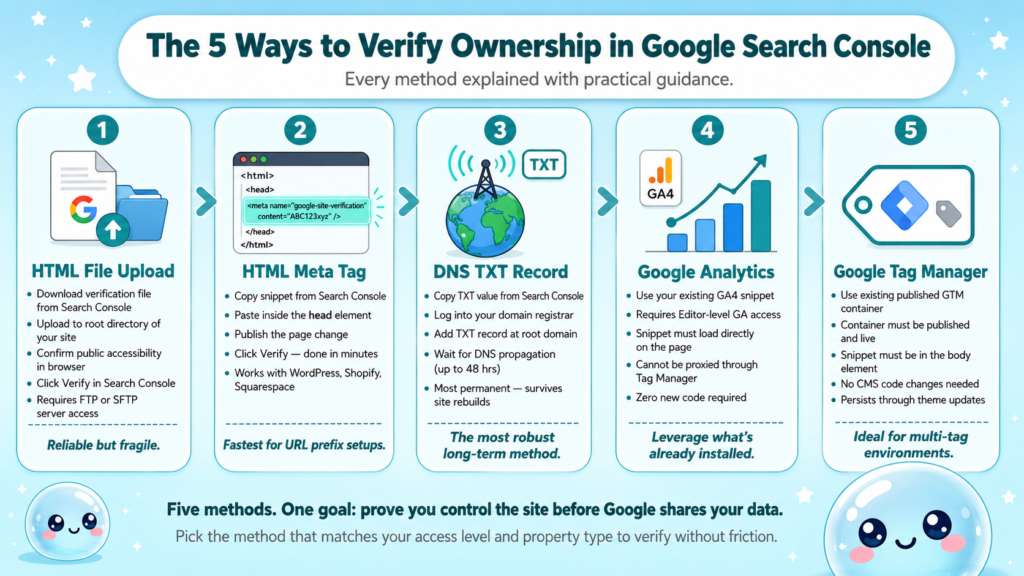
Method 1: HTML file upload
- Download the verification HTML file from Search Console.
- Upload it to the root directory of your site (e.g., yoursite.com/googleXXXXXXX.html).
- Confirm the file is publicly accessible in a browser.
- Click “Verify” in the Search Console.
This requires web server access or FTP/SFTP credentials. It is reliable but fragile: if you ever reorganize your file structure or the file gets deleted during a migration, verification breaks.
Method 2: HTML meta tag
- Copy the meta tag snippet from Search Console.
- Paste it inside the head element of your homepage, before the closing tag.
- Publish the change.
- Click “Verify.”
This is my go-to for most URL prefix setups. It is fast, reversible, and most CMS platforms (WordPress, Shopify, Squarespace) make it trivially easy.
Method 3: DNS TXT record
- Copy the TXT record value from Search Console.
- Log into your domain registrar.
- Add a new TXT record at the root domain with the given value.
- Wait for DNS propagation (usually under an hour, sometimes up to 48 hours).
- Click “Verify.”
This is required for domain properties and is the most permanent option since it survives site rebuilds.
Method 4: Google Analytics
Use your existing GA4 snippet. You must have edit-level access to the Analytics property, and the snippet must be on the page directly (not via a tag manager layer).
Method 5: Google Tag Manager
Use your existing GTM container. The container must be published and the snippet must be in the body element as required.
HTML Tag vs DNS Verification: Which Is Better for Your Situation?
This is the question I get asked most often, especially from SEO managers inheriting someone else’s setup. The short answer: it depends on the property type and how much control you have over the site.
| Factor | HTML Meta Tag | DNS TXT Record |
| Property type supported | URL prefix only | Domain property (required) |
| Where you add it | Site code (head element) | Domain registrar DNS panel |
| Survives site migration? | No (code gets wiped) | Yes (DNS is independent of CMS) |
| Speed to verify | Minutes | Up to 48 hours |
| Access needed | CMS or code access | Domain registrar login |
| Best for | Individual sites, quick setups | Agencies, multi-subdomain setups |
When I recommend HTML meta tag:
- You’re setting up a single site for yourself or a client with a standard CMS.
- You need verification done in the next 30 minutes.
- The site won’t be undergoing a major platform migration soon.
When I recommend DNS TXT verification:
- You want a domain property that consolidates www and non-www, HTTP and HTTPS, and all subdomains.
- You’re setting up on behalf of a client and don’t want to lose verification if they update their theme or switch platforms.
- The site has multiple subdomains that each need coverage.
One thing I tell every SEO freelancer I work with: the DNS method is the safer long-term choice for client sites. A CMS update that regenerates the theme header will silently wipe an HTML meta tag, and you won’t know until verification lapses and data stops flowing.
For a broader look at what an SEO audit should include beyond just verification, the fundamentals haven’t changed.
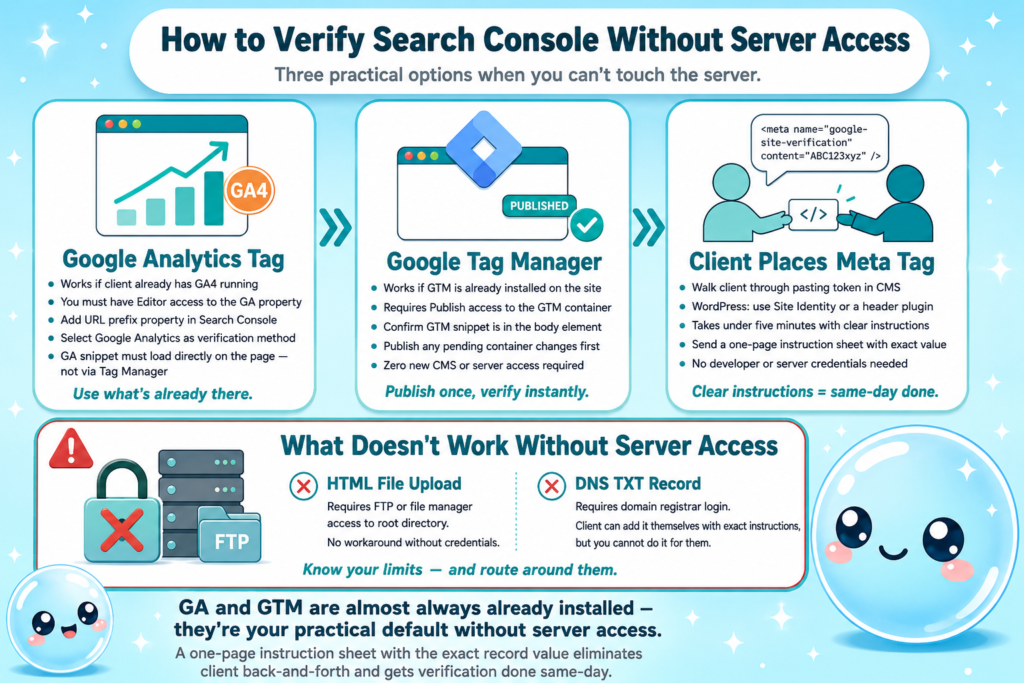
How to Verify Google Search Console Without Server Access
This comes up constantly in agency work. The client controls the domain or the CMS, and you need verification without being handed full server credentials. Here’s how I handle it.
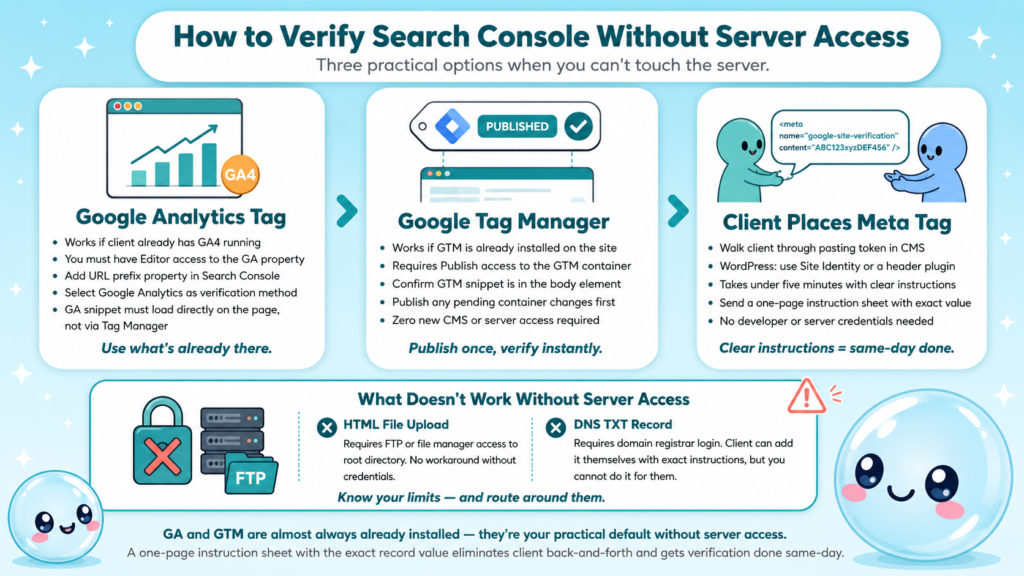
Option 1: Google Analytics tag (no server access needed)
If the client already has GA4 running, and you have been granted Editor access to the Analytics property:
- Add the URL prefix property in Search Console.
- Choose the Google Analytics verification method.
- Search Console confirms the GA tag on the page and verifies automatically.
The catch: the GA snippet must load directly on the page, not proxied through a tag manager layer for this method.
Option 2: Google Tag Manager
If GTM is installed and you have Publish access to the container:
- Confirm the GTM snippet is in the body element as specified.
- Select GTM as the verification method in Search Console.
- Publish the container if any recent changes are unpublished.
- Click “Verify.”
Option 3: Ask the client to place the HTML meta tag
If the client uses WordPress, walk them through pasting the Search Console verification token into the “Site Identity” or a header plugin field. This takes five minutes and requires no developer.
What does not work without server access:
- HTML file upload (requires FTP or file manager access)
- DNS TXT record (requires domain registrar login, though the client can add the record themselves with clear instructions)
When working with clients, I always send a one-page instruction sheet with the exact record value to paste. It eliminates back-and-forth and gets verification done same-day.
How to verify ownership of Google Search Console without server access ultimately comes down to leveraging tools already installed on the site. GA and GTM are almost always present, which makes them the practical default.
Best Way to Verify Google Search Console for a Client Site
Managing verification for clients introduces a layer of complexity that solo site owners never have to think about. Ownership transfers, delegated access, and maintaining continuity across team changes all require a deliberate setup.
My recommended workflow for client onboarding:
- Create the property under the client’s own Google account, not yours.
- Request that the client verify ownership using DNS TXT (domain property) for permanence.
- Have the client add you as a delegated owner or full user inside the property settings.
- Set up your own verification token as a secondary owner so your access persists independently.
Why not just verify under your agency account?
If you verify under your account and the relationship ends, the client loses access to their own data unless you transfer ownership. That creates a messy, trust-damaging situation. Always verify under the client’s primary Google account.
User roles in Search Console:
- Owner: Full access, can add/remove users, can verify/unverify.
- Full user: Can view all data, submit sitemaps, and request indexing.
- Restricted user: Read-only access to most reports.
For agencies, white label SEO setups often require that the client remains the verified owner while the agency operates with delegated full-user access.
Can you verify multiple websites in Google Search Console at once?
Yes. There is no limit on the number of properties you can add to a single Google account. Each property requires its own verification, but you can manage them all from one Search Console dashboard. This is standard practice for agencies and freelancers with large portfolios.
Google Search Console Verification Failed: What to Do
Verification failures are frustrating, but they always have a root cause. Here are the ones I encounter most frequently and how I fix them.
Common failure reasons and fixes:
- Meta tag not in the head element: Some page builders inject content into the body element instead. Inspect the page source and confirm the token appears inside the head block, before any body content.
- Tag is behind a login or paywall: Search Console’s verification crawler cannot authenticate. Use DNS TXT instead.
- Redirect stripping the token: A 301 from HTTP to HTTPS or www to non-www can land the crawler on a page without the tag. Verify the canonical URL directly.
- DNS propagation incomplete: TXT records can take up to 48 hours. Wait and retry before assuming failure.
- GTM container not published: An unpublished GTM container means the tag never fires. Publish the container first.
- GA snippet loaded via tag manager: Search Console’s GA verification checks for the snippet directly in the page source. If it only exists inside GTM, the check fails.
Step-by-step debugging for a failed verification:
- Open the page source of your homepage and search for the verification token.
- If it is missing, the tag was never saved or was overwritten.
- If it is present, check whether the page returns a 200 status code (use a status checker or browser dev tools).
- Confirm no robots.txt rule is blocking Googlebot from accessing the page.
- Re-attempt verification in Search Console.
The most common silent failure I see: a caching plugin serving an old version of the page that predates the meta tag addition. Always purge cache before clicking Verify.
Understanding how to verify ownership Google Search Console correctly the first time saves hours of debugging. But if you’re still stuck, sneo AI can analyze your Search Console setup and surface configuration issues directly.
How to Use Google Tag Manager to Verify Google Search Console
GTM-based verification is underused, partly because the documentation is thin and partly because the requirement (snippet in the body element) trips people up. Here is exactly how it works.
Prerequisites:
- Google Tag Manager installed on the site with a published container.
- The GTM snippet must be placed immediately after the opening body tag (not just in the head element).
- You need Publish-level access to the GTM container.
Step-by-step:
- In Search Console, add a URL prefix property.
- Under “Other verification methods,” select Google Tag Manager.
- Search Console displays your GTM container ID (formatted as GTM-XXXXXXX). Confirm this matches the container installed on your site.
- Ensure the GTM snippet is correctly placed: one snippet in the head element, and the noscript fallback immediately after the opening body tag.
- Publish any pending changes in your GTM container.
- Return to the Search Console and click “Verify.”
Why this method is useful:
- No code changes to the CMS are required once GTM is installed.
- Verification persists through theme updates since GTM is injected independently.
- If you are already managing analytics and marketing tags through GTM, this adds zero new dependencies.
Common mistake: People add the GTM snippet only in the head element, omitting the body noscript portion. Search Console’s GTM verification specifically looks for the correct dual-snippet placement. If either piece is missing, verification fails.
How to verify ownership Google Search Console via GTM is particularly useful when you manage a high volume of sites through a single GTM account, since it ties verification to infrastructure you already control.
Conclusion
- Verification is non-negotiable: without it, you have no access to Search Console’s crawl, indexing, or performance data.
- Match the method to your access level: DNS TXT for domain properties and permanent setups, HTML meta tag or GTM for fast URL prefix verification.
- Failed verifications almost always trace to placement errors, caching, or incomplete DNS propagation.
- Once verified, connect sneo AI to your property to move from raw Search Console data to actionable SEO answers.
Frequently Asked Questions
Q1: How long does Google Search Console verification take?
HTML meta tag and Google Analytics verification complete in minutes. DNS TXT records can take up to 48 hours for propagation, though they typically resolve within a few hours. GTM verification is near-instant once the container is published.
Q2: Will I lose verification if I change my website’s theme or CMS?
HTML meta tag and HTML file verification can break during theme updates or platform migrations because the code gets overwritten. DNS TXT verification survives these changes since it lives at the registrar, not on the site.
Q3: Can multiple people verify the same Search Console property?
Yes. Multiple owners and users can be added to a single property. Google allows adding delegated owners, full users, and restricted users, which is standard practice for agencies managing client sites.
Q4: How do I verify a subdomain in Google Search Console?
Add it as a separate URL prefix property (e.g., https://blog.yoursite.com) and verify using any of the five methods. Alternatively, use a domain property via DNS TXT, which automatically covers all subdomains.
Q5: What happens if my Search Console verification lapses?
You lose access to the property’s data until you re-verify. Google sends an email warning before removing access. No historical data is lost; it is simply inaccessible until verification is restored.
Q6: Is Google Search Console the same as Google Webmaster Tools?
Yes. Google Webmaster Tools was rebranded to Google Search Console. The core functionality remains the same: site ownership confirmation, search indexing reports, crawl data, and performance metrics are all accessed through the same platform.