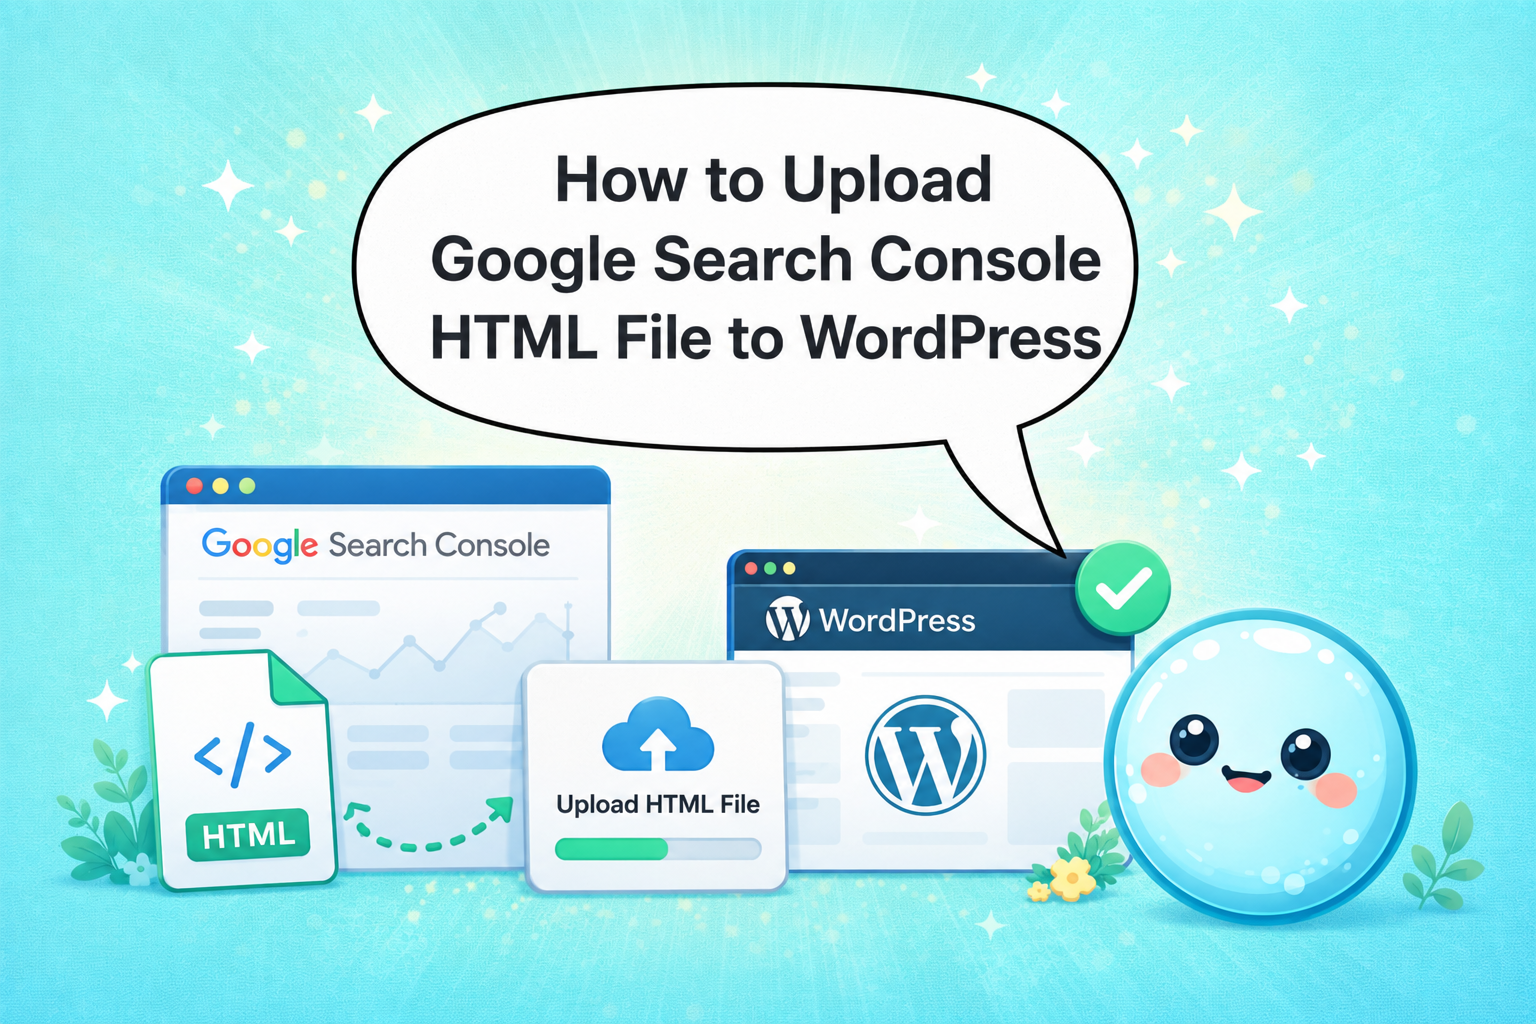

Figuring out how to upload Google Search Console HTML file to WordPress trips up more site owners than it should. The process sounds technical, but once you understand where the file goes and why, it takes under five minutes. I’ve walked dozens of clients through this exact verification step, and the confusion almost always comes from the same two things: not knowing which method to use and not knowing where WordPress actually serves files from. This guide covers every reliable path, including plugin shortcuts and manual FTP options, so you can get verified and start pulling data fast.
TL;DR
- Download the HTML verification file from Google Search Console and upload it to your WordPress root directory (public_html) via cPanel, FTP, or SFTP.
- Plugin methods (Yoast SEO, Rank Math) let you verify without touching any files.
- After uploading, confirm the file is publicly accessible before clicking “Verify” in GSC.
- If verification fails, the file is almost always in the wrong folder or blocked by a security plugin.
Google Search Console HTML File Upload to WordPress: Step by Step
This is the core method, and it’s the one Google recommends when you want maximum control over site ownership verification without relying on third-party plugins.
- Sign in to Google Search Console: Go to search.google.com/search-console and click “Add property.” Enter your full domain.
- Select HTML file verification: In the verification panel, choose the “HTML file” tab. Google will generate a uniquely named file like google1a2b3c4d.html.
- Download the HTML file: Save it somewhere you can find it. The filename is unique to your property, do not rename it.
- Log in to your hosting cPanel: Most hosts provide cPanel access via yourdomain.com/cpanel. Open the File Manager from the dashboard.
- Navigate to the public_html folder: This is your WordPress root directory. You’ll see wp-config.php, wp-admin, wp-content, and other core WordPress files here. This is exactly where the verification file must live.
- Upload the HTML file: Use the “Upload” button in File Manager. Select the file and confirm the upload completes successfully.
- Test the URL before verifying: Open a browser tab and visit https://yourdomain.com/google1a2b3c4d.html. You should see plain text that matches the file contents. If you get a 404, the file is in the wrong folder.
- Click “Verify” in Google Search Console: Return to GSC and click Verify. Google’s crawler will fetch that URL and confirm the file exists. Verification typically completes within seconds.
If your WordPress installation is in a subdirectory (e.g., /wordpress/), the file still goes in the true root public_html, not inside the subdirectory, because the verification URL always points to the domain root.
Once verified, connect your XML sitemap and check that Googlebot can crawl your key pages. If you want a deeper read on why ongoing SEO maintenance matters after verification, that’s worth reviewing next.
What Is the Easiest Way to Verify Google Search Console on WordPress Without FTP?
If you’d rather skip file management entirely, plugin-based verification is the fastest path. No FTP client, no cPanel access, no file uploads. Two plugins handle this cleanly.
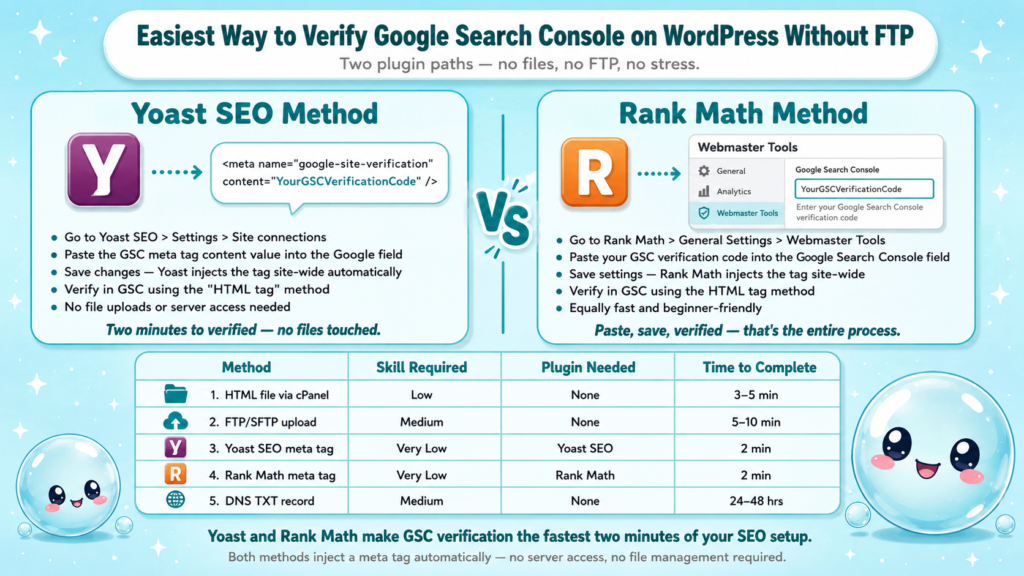
Using Yoast SEO:
- In your WordPress dashboard, go to Yoast SEO > Settings > Site connections.
- Paste the meta tag verification code (not the HTML file) from Google Search Console into the Google field.
- Save changes. Yoast outputs the meta tag in your site’s head element automatically.
- Return to GSC and verify using the “HTML tag” method.
Using Rank Math:
- Go to Rank Math > General Settings > Webmaster Tools.
- Paste your GSC verification code into the Google Search Console field.
- Save. Rank Math injects the tag site-wide.
- Verify in GSC using the HTML tag method.
Both approaches output a <meta name=”google-site-verification”> tag in the head of every page. Google reads it on the first crawl and confirms ownership.
Comparison of WordPress GSC verification methods:
| Method | Technical skill required | Plugin dependency | Time to complete |
| HTML file upload (cPanel) | Low | None | 3–5 min |
| FTP/SFTP upload | Medium | None | 5–10 min |
| Yoast SEO meta tag | Very low | Yoast SEO | 2 min |
| Rank Math meta tag | Very low | Rank Math | 2 min |
| DNS TXT record | Medium | None | 24–48 hrs propagation |
For most WordPress site owners, the Yoast or Rank Math route is fastest. If you’re comparing those two plugins, this breakdown of Yoast vs. All in One SEO gives useful context on which suite fits your workflow.
How to Upload the HTML Verification File to the WordPress Root Directory via FTP
When cPanel isn’t available or your host doesn’t offer a file manager, FTP or SFTP is the direct alternative for answering how to upload Google Search Console HTML file to WordPress.
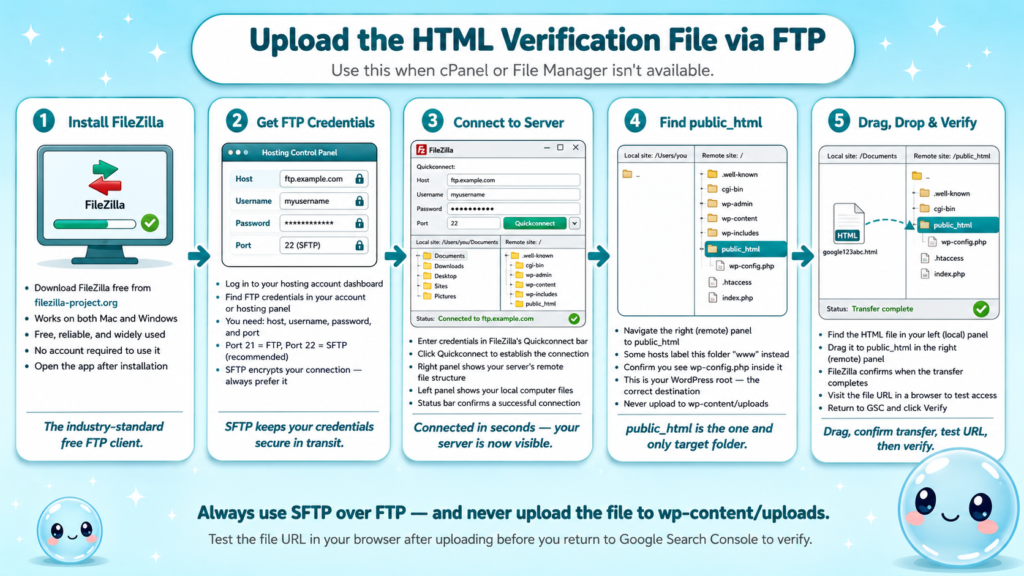
- Download an FTP client: FileZilla is free and works on Mac and Windows. Install it from filezilla-project.org/download.php.
- Get your FTP credentials: Log in to your hosting account and find FTP credentials under your account or hosting panel. You’ll need host, username, password, and port (usually 21 for FTP, 22 for SFTP).
- Connect to your server: Enter credentials in FileZilla’s Quickconnect bar. SFTP is recommended over plain FTP because the connection is encrypted.
- Locate publichtml in the remote panel: Once connected, the right panel shows your server’s file structure. Navigate to public</span>html (or www on some hosts).
- Drag the HTML file from your local panel: In the left panel, find your downloaded verification file. Drag it to public_html on the right. FileZilla confirms when the transfer completes.
- Verify the URL is accessible: Visit https://yourdomain.com/[your-filename].html in a browser before heading back to GSC.
- Complete verification in Google Search Console: Click Verify. Done.
One mistake I see regularly: people upload the file to wp-content/uploads/ because that’s where WordPress media lives. That path won’t work for GSC verification since the URL Google checks always points to the domain root.
SFTP access is increasingly standard on managed WordPress hosts like WP Engine, as they disable plain FTP by default for security reasons. Check your host documentation if the FTP connection fails on port 21.
How to Add Google Search Console Verification Using Yoast SEO or Rank Math
Plugin-based verification isn’t just easier, it’s also more resilient. When you answer how to upload Google Search Console HTML file to WordPress with a file upload, that file can accidentally get deleted during a migration or server cleanup. A meta tag injected by a plugin persists as long as the plugin is active.
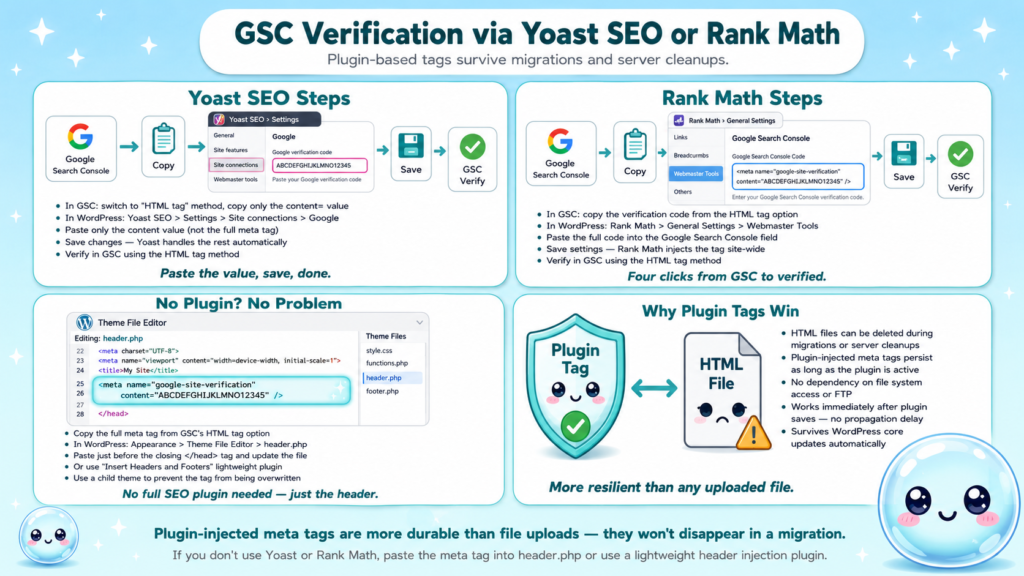
Yoast SEO detailed steps:
- In GSC, switch to the “HTML tag” verification method and copy the full meta tag content value (the string after content=”).
- In WordPress: Yoast SEO > Settings > Site connections > Google.
- Paste only the content value (not the full meta tag) and save.
- Verify in GSC.
Rank Math detailed steps:
- In GSC, copy the verification code from the HTML tag option.
- In WordPress: Rank Math > General Settings > Webmaster Tools > Google Search Console.
- Paste the code and save settings.
- Verify in GSC.
What if you don’t use either plugin?
You can add the meta tag manually by editing your theme’s functions.php or using a lightweight plugin like “Insert Headers and Footers.” Paste the full meta tag from GSC into the header section. This is a clean approach when you want to avoid adding a full SEO plugin just for verification.
Understanding how GSC data feeds into a complete SEO audit is the real payoff here. Verification is just the door. Once you’re in, you can diagnose crawl errors, track average position, and find pages losing traffic before the drop becomes a problem.
Google Search Console HTML File Verification Not Working on WordPress: Fixes
This is the section most people need after the steps above fail. Here are the causes I’ve diagnosed most often, and how to fix each one.
File is in the wrong directory:
The most common issue. If your WordPress install lives at public<span style=”font-style:italic;”>html/wordpress/, you may have uploaded the file there. The verification URL is always yourdomain.com/filename.html, which maps to public</span>html, not any subdirectory.
WordPress is redirecting the URL:
Some permalink structures or security plugins intercept requests to unknown .html files and return 404s or redirects. Test by visiting the file URL directly. If you get a redirect instead of plain text, temporarily deactivate security plugins (like Wordfence or iThemes Security) and retry.
The file was renamed during upload:
Some file managers add .txt to uploaded files or alter the filename. Confirm the filename in public_html exactly matches what Google provided, including capitalization.
Cloudflare or CDN caching:
If your site runs behind Cloudflare, the CDN may serve a cached version of a previous 404. Purge the Cloudflare cache after uploading the file before you attempt verification.
The domain property vs. URL prefix mismatch:
If you added a Domain property in GSC, HTML file verification isn’t supported, only DNS TXT records work for Domain properties. Switch to a URL prefix property if you want to use the HTML file method.
After fixing the issue, always manually test the file URL in a private browser window before clicking Verify in GSC. What you see in that URL is exactly what Googlebot will see.
If verification keeps failing after all of this, the DNS TXT record method bypasses file access entirely. Understanding what average position in GSC means becomes immediately useful once you’re actually inside the platform.
Can You Verify Google Search Console on WordPress Without a Plugin or FTP?
Yes. Two methods require zero file access and zero plugins, making this the answer to how to upload Google Search Console HTML file to WordPress when you have no server access at all.
Meta tag via theme editor:
- In GSC, copy the full HTML meta tag from the “HTML tag” method.
- In WordPress: Appearance > Theme File Editor > header.php (or your theme’s equivalent).
- Paste the meta tag just before the closing </head> tag.
- Update the file and verify in GSC.
Caution: editing theme files directly means your tag disappears if you switch themes or update to a theme that resets header.php. Use a child theme or a header plugin to make this permanent.
DNS TXT record verification:
- In GSC, select the “Domain” property type and copy the TXT record value.
- Log in to your domain registrar (GoDaddy, Namecheap, Cloudflare DNS, etc.).
- Add a new TXT record with @ as the host and the GSC value as the content.
- Wait for DNS propagation (typically a few hours, sometimes up to 48 hours).
- Click Verify in GSC.
DNS verification is the most robust option because it persists regardless of WordPress updates, plugin changes, or theme switches. It’s the method I recommend for client sites where I won’t have ongoing access to the WordPress dashboard.
Once your site is verified and data starts flowing, tools like sneo.ai’s Google Search Console alternative let you ask plain-language questions about your traffic and get answers without digging through GSC’s interface manually.
Conclusion
- Upload the HTML file to public_html (your WordPress root directory) via cPanel File Manager or FTP, not to any WordPress subdirectory.
- Plugin methods (Yoast SEO, Rank Math) are faster and more resilient than file uploads for most users.
- DNS TXT record verification is the best long-term option when you want zero dependency on files or plugins.
- Test the file URL in a browser before clicking Verify, and purge any CDN cache first.
Verification is the starting line, not the finish. Once GSC is connected, the real work of reading crawl data, fixing indexing issues, and tracking keyword performance begins.
Frequently Asked Questions
Q1: Where exactly do I upload the Google Search Console HTML file in WordPress?
Upload it to the public_html folder, which is your WordPress root directory. This is the same folder that contains wp-config.php. Do not place it inside wp-content, wp-admin, or any theme folder. The file must be accessible at https://yourdomain.com/filename.html.
Q2: Can I verify Google Search Console on WordPress without any plugin?
Yes. Use the HTML file method via cPanel File Manager, FTP/SFTP, or add the meta tag directly to your theme’s header.php. The DNS TXT record method also works without touching WordPress at all and is the most durable option.
Q3: Why does my Google Search Console HTML file verification keep failing on WordPress?
The file is usually in the wrong directory, blocked by a security plugin, or cached by a CDN. Check that the file lives in public_html, visit the file URL directly to confirm it returns plain text, and purge your CDN cache before retrying verification.
Q4: How long does Google Search Console verification take after uploading the HTML file?
File-based verification is almost instant once Google fetches the URL, usually within seconds of clicking Verify. DNS TXT record verification takes longer due to propagation time, typically a few hours but up to 48 hours in some cases.
Q5: Will my GSC verification break if I update WordPress or change themes?
File-based and DNS verification survive theme changes and WordPress updates. Meta tags added directly to header.php will break if you switch themes or the theme file resets. Plugin-injected meta tags persist as long as the plugin stays active and installed.
Q6: Do I need to re-verify Google Search Console if I move to a new host?
If you used DNS TXT verification, no, DNS records move with your domain, not your host. If you used the HTML file method, you’ll need to re-upload the file to the new host’s public_html folder. Plugin meta tags will carry over if you migrate WordPress with the plugin intact.